I officially started work on the car today. I got the hood off and started disconnecting and pulling out the accessories, vacuum lines, electrical harness, brackets and so on. Everything went pretty smooth, but there were a couple surprises and a few things that will have to be taken care of later on.
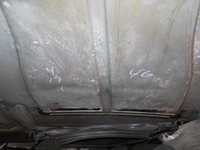
One fun find was hidden on the underside of the hood. I pulled the hood, removed the insulation and, despite using the right tool, I ended up breaking most of the insulation retainers. That wasn't a big surprise given they've been soaking up engine heat for 30 years. What was neat was what I found under the insulation: there was writing in white paint marker - the left louver impression has "4 17 1" written vertically and the right louver impression has " 46" then "A" then "4-17-1" written. I'm not sure what this means. Maybe a production date of 4/17/81? There's a bigger picture of this under Project Photos here on the site. I plan to leave the factory markings there when the hood is eventually re-painted.
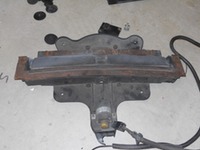
The other find under the hood was my Crossfire flap assembly had completely separated from the hood. I knew there was a problem before I took it apart because the flaps were not even close to sitting in the hood openings correctly. You can see in the pic at the right that the steel retainer brackets the assembly bolts to are still attached to flap assembly instead of the hood. The rear tab of the flap assembly (bottom of the pic) is also broken off. The flaps were being held in place by nothing more than the hood insulation. I'll need to re-bond the retainers to the hood and I'm not sure how to fix the tab that's snapped off.
Everything else went smoothly. A few connector retainer clips on the electrical harness broke as I was disconnecting things, so those will need to be replaced before everything goes back together. Some of the plastic was so brittle I'm not sure I could have saved them. I will need to find replacement pigtails and am considering a replacement harness from Painless or the like, if that's even possible.
I was also concerned about the number and routing of the various vacuum lines, but as I got deeper into taking things apart, it all made sense. When I got done tonight I went back and flipped through the Assembly Manual, which shows where everything goes. The diagrams in the manual matched what I'd seen during disassembly, so when the time comes to put everything back together it should go pretty smoothly.
I still have some disassembly and disconnecting to do before the engine is ready to come out. Maybe another day or so take care of that. It'll probably be another couple of weeks before I get another full day to work on the car, so progress will be slow, but it felt good to finally get things started.